Thursday, November 29, 2018

Week Six - I Made a Website!

This week, I tested out the heat-treated agates, repaired my pressure flaker, and made a website!  I was also informed that the links to my pictures have not been working.  I wish I knew this earlier, but I think I fixed it.  Please tell me if the link asks for your permission before viewing the image.

Yes, here's the link to my website.  Please tell me if it does not work.  We learned about Google Sites in my Google Docs and Applications class and I decided to put that knowledge to good use for my blog.  On this website, you'll see definitions of words I have and haven't used, videos from YouTube to show you flintknapping in action, pictures of all my arrowheads neatly ordered, and all of my blogs!  It was quite a bit of work, and I been chipping away at it for the last three weeks.  It is partly why this blog is not as long as I wanted it to be, but this should make up for it.  Please view it!  I was even able to use my failed arrowhead background from a couple weeks ago!  This paragraph won't be on the website as it would be a little awkward reading about the website you are currently on.


The main pressure flaker I use has been getting dull and has gotten quite shorter.  As such, it started to become difficult to use, so much so that I began to use the flattened pressure flaker instead.  Many times, the wooden dowel the copper rod is embedded in would be in the way.  I asked my father how I could fix the pressure flaker, and he said to take a knife and shave down the wood to expose more of the copper rod.  He also got out some files so I could sharpen the flaker.  The one on the left was the dull version, and the one on the right is the sharpened version.  The copper isn't all that durable, so it does wear down over time, especially if you are using it for several hours a week for a couple of months.  Now, it should be much easier to use, and I know how to repair it in the future.


This was my first arrowhead to be made from the heat-treated agates.  The agate on the left was the one used and was about the perfect size.  The agate was extremely hard to work, though.  This was partly due to the shape and edges of the agate, but also simply because the agate was a piece of tough material.  The edges of the agate had a rounded contour.  This is nice if you plan to keep the agate in a collection, but it also made pressure flaking nearly impossible.  Control-click the graphic to see a larger version.

The pressure flaker would slip off the edge.  I could have placed the pressure flaker higher up on the edge, but that would require more pressure and strength.  Eventually, I moved on to the copper mallets to prepare the edge.  I could deliver a more powerful blow with them which manage to flake part of the edge.  The other parts of the agate's edge could not be prepared with the copper mallets, so I tried something new.  I had read that the copper mallets are softer than stone, so I got the idea that maybe using the hammerstones would be able to deliver the blow necessary to remove this rounded edge.  They were slightly harder to use than the mallets, but they did work better.  A weird thing I noticed while using them was that they smelled like gunpowder.  I think that this may be more due to the bags they were stored in rather than the stones themselves smelling like gunpowder.

In the end, the arrowhead turned out okay.  There are few flat sections I was unable to remove, and the tip did break off while working at it.  The edge is clean, though, and the overall appearance is appealing.


After the first agate arrowhead, I tried using the agate circled in the left image.  It slipped my mind to take a before photo, so the left photo is what you get.  You can see how the agate looks really cool and would make a beautiful arrowhead.  I broke off the smaller portion of the L-shape and began working.  Unfortunately, it was as hard as the novaculite from last week.  I tried going at it with the copper mallets, but it only broke the small piece more due to some interior cracks.  Also, the white portion of the agate had very large crystals that wanted to simply crumble away when pushed against.  In the end, I couldn't get anything from that agate, so I was glad I broke it in half so it was not entirely wasted.


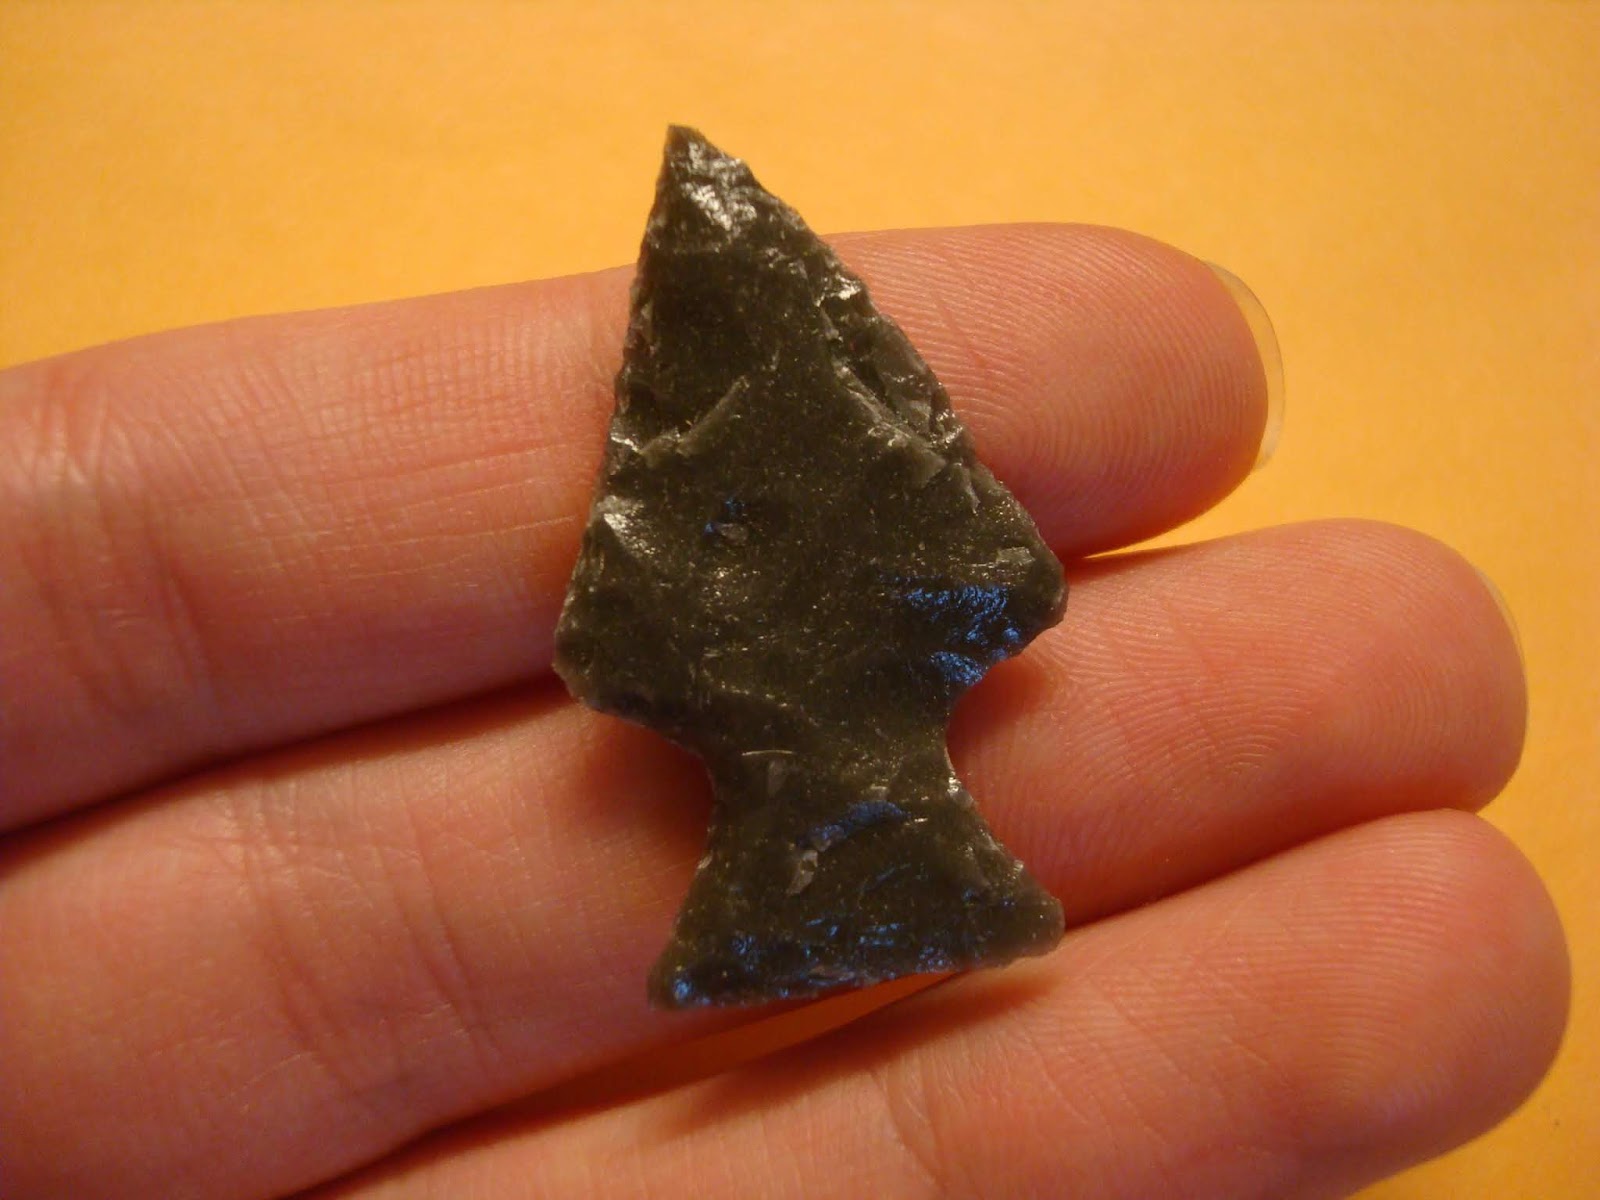
My second arrowhead of the week was made from the porcellanite, or non-volcanic glass, I used last week.  I had a few shards leftover, and I kept them in case I could use them.  The piece was more square shaped, so I went with this style of notching in order to do something unique and to not have to reduce the size of the piece too much.  All in all, it turned out rather nice and was much easier to make than the agate arrowhead above.


I forgot to take a picture, but this arrowhead was made from the bottom of a small, white jar.  My dad broke the jar for me to use weeks ago, but I never got around to it.  Working this glass arrowhead was extremely easy.  I had sort of became used to the stone, so I didn't realize how much easier glass is too work.  Popping off the first flakes require about the same amount of pressure, but once the edge has been reduced and worked, the glass has the obvious advantage.  I believe I mentioned in last week's post that the longest flakes can be removed from the unworked edge of the material.  That is, an edge that is at right angles with the face of the piece.  I noticed while working this glass arrowhead that I could remove long flakes even while I finishing up the piece.  In other words, I have become more skilled at flintknapping.  I also have been developing and strengthening the muscles needed, as well.

The arrowhead turned out really nice, but there is one discolored spot in the glass towards the upper left of the arrowhead.  It is sort of clear there, so I think there must have been some inconsistencies in the glass used.  Perhaps the chemicals used to color the glass were not fully mixed in.


Absolute trash is what this agate arrowhead is.  It was made from the agate seen on the left.  This piece of agate was about an inch and a half in diameter.  I tried a bit of flaking on the edge, and it was very difficult.  Because of this, I decided I ought to break the agate in half before I began to work.  After all, my finished arrowhead would be a nice size, but look horrific due to the large flat portions that would remain.  Instead of snapping cleanly, I got a bunch of little slices as the agate fractured radially.  Many of these slices also had cracks within them, so they would snap in the middle of working them. When an arrowhead is extremely small, it is difficult to place the pressure needed to remove a flake because the material will wiggle and flip about.  This meant that the final outcome is not at all clean, is way too thick for its size, and still has the flat sections.

I doubt that we failed the heat-treatment.  Instead, I think that agates are just very hard to work no matter what.  I do not think I will make any more arrowheads from agates as I do not want to waste the beautiful agate slabs my dad has.  Besides, next week is the final week, and there are some very cool pieces of glass I want to make some arrowheads from.


This arrowhead was rather small, and like the other porcellanite arrowhead above, it was made from a small shard I held on to.  This was a shape I have been wanting to make for some time, but I could never get the material to work with me.  The tang on the upper right was damaged, but it turned out fine.


These two arrowheads are a couple my father made, and he decided to take some pictures of them the same way I have.  The left is a piece of obsidian with a bizarre golden sheen.  My father thinks that I might be caused due to the minerals that made the obsidian.  Although it can't be easily seen in the photo, it looks very cool.  That arrowhead was originally part of a spear point he was making that snapped in half.  I mentioned in the previous blog in which I attempted to make a glass spear point.  I hope to be able to make an obsidian spear point next week, but if it breaks in half, I will make two smaller points.  The one on the right is a piece of gray fiberglass, and it has an almost otherworldly effect.  My father has a couple pieces of candy-striped fiberglass for me to use, so they should look beautiful if I can get them to work with me.  It is not pictured, but there is also a piece of iridescent glass I am eyeing.  When held to the light, a fire dances within.  Please be sure to check out my next blog to see how these will go.  Since they are all glass more or less, I will hopefully not have much difficulty working them.

All in all, I am quite disappointed with this week.  I wanted to make some stone arrowheads from a number of different materials, but I failed with the agate.  I think it might be more that the material was too hard and not that I am not skilled enough.  Either way, I also made fewer arrowheads than I wanted to.  Part of this was due to Thanksgiving taking a large chunk of time I could use away and because I had a number of other things to do.  I also made that website, though I mainly worked on it while at my Grandma's when I didn't have access to my flintknapping tools.  Personally, I do not really care for the two-week period we had last week or this week.  I am on schedule, though, and I will move on to some neater pieces for next week's blog.  Be sure to come back next week to see them!

Thursday, November 15, 2018

Week Five - Baked and Stoned

I don't want to include this in my blog, but I do want you guys to see it.  It goes with the title.

I ended last week's blog by stating that I would be moving onto stone this week and perform some heat-treating.  I did just that this week and made four stone arrowheads, two glass arrowheads, and returned to an earlier piece.  Sorry if my blog is a little disorganized.  I didn't realize this was a two-week period and had nearly completed my blog when it was brought to my attention.  As such, I had to add some new material from the extra week, and the whole post may read like two weeks were combined.


These are some agates my father has.  They were once my grandfather's, and he used them in jewelry and belt buckles.  The pink stone is novaculite.  These stones can be used as they are for flintknapping, but they would be very hard to work.  What heat-treating does is make the stone easier to work by melting the micro-crystals together into crypto-crystals, which are smaller.  The reason why glass is easy to work is because it is amorphous, or lacks a crystalline structure.  Rocks with a crystalline structure can be used in flintknapping, but it is best to heat-treat the rocks beforehand so the crystals are as fine as possible.


To heat-treat, we buried the agates and novaculite in the sand.  We set the oven to three hundred fifty degrees and baked the stones for eight hours.  After the eight hours, we turned off the oven and let them cool overnight.  I will see and talk about the result of the heat-treating process next week.  We used our oven for heat-treating, but the native peoples would have used the coals of a campfire.


Similar to last week, I made a total of five arrowheads for the first half of the two-week period.  The three dark-gray ones are made of non-volcanic glass.  A more proper name for them, though, is porcellanite, and it forms when coal seams burn and melt the surrounding rock.  If the surrounding rock has the proper composition of quartz and cools correctly, non-volcanic glass forms.  As such, it wasn't too difficult to work with and most of the problems I encountered with the glass were present with the stone.


This was the form of the porcellanite before I started to work it.  My father had purchased stones already cut for flintknapping, so I guess I will still have to deal with those flat sections and driving the flakes across the face.  The pink stones are novaculite.  I, however, didn't use them as they were way too difficult to work, even after heat-treating.  I could not even get a sub-par flake to form on them.


This was the first one of the week.  I started by breaking the above piece of stone in two so I wouldn't waste the whole slab.  It has a rather odd shape because the stone broke badly half way in.  I decided to continue with the piece instead of trashing it and got this.  The stone required a bit more pressure to work, but it was not that much harder than glass.  The arrowhead could be cleaned up a bit, but I didn't want to break it even more.


I used the bottom of the other glass bottle Kaden donated for this arrowhead.  I had some extra time and decided to use it for this.  It isn't really that clean of an arrowhead as I wasn't trying too hard with it.  Otherwise, nothing too eventful occurred with this arrowhead.


The third arrowhead was made from the other half of the porcellanite slab.  The reason it has such a pronounced stem is because I removed a flake that was way too large.  I could have reduced the size of the arrowhead or simply mirror the mistake and use it in the notching.  I choose the latter, and it turned out okay.  I do not like how it is not symmetrical, though.  I feared I could snap it in twain, so the work needed to make it symmetrical was not done.


This was not a new arrowhead but rather an older one I cleaned up.  The picture on the left shows how the arrowhead use to look and the one on the right shows the improved version.  The image quality also improved.  It was my third arrowhead and probably my worst.  A section of the plate was used to make a teardrop-shaped arrowhead, but I was not skilled enough to make anything of value.  I returned to it this week, just like I said I would, and managed to make it look much better.  There are still the large flat sections, but the edge is much more even.


My final arrowhead of the week was this guy.  Most of the same problems occur over and over again, so it is kind of getting harder to talk about each arrowhead without repeating myself.  Anyhow, this arrowhead was made from a portion of a porcellanite slab and has the weird shape due to a bad break.  I decided to go for this shape instead of reducing the arrowhead's size even further.


These three arrowheads were made for the second half of the two-week period.  The gray ones are the porcellanite, or non-volcanic glass, and the brown one is the bottom of a beer bottle.


Nothing too exciting happened with this piece.  The only thing of note is that this was from a porcellanite slab that I able to get three arrowheads from.  I hope to be able to get multiple arrowheads from the agate slabs.


As mentioned above, this came from a beer bottle bottom.  I had three bottles to work with, but only managed to make one arrowhead as the other bottles didn't want to work with me.  I started by scoring about the bottom of the bottle and striking it with a mallet.  The bottom itself was not exactly curved but rather composed of three straight sections as seen in the graphic.  The circled section was flat enough and thick enough that an arrowhead could be made.  There still is a slight curvature to the arrowhead, though.


This was my final arrowhead of the week and probably my worst.  Whereas I was able to remove the flat sections from all the other arrowheads, was unable to do so with this one.  The reason why was because I kept reducing the size to get the shape I wanted.  However, the best flaking can only be performed on the unworked edge of an arrowhead.  Once the edge has been worked numerous times, the flakes start to become short and thick.  If you look closely on the image, you can see a sort of boundary line on the right side.  I reduced the arrowhead by working at that side, but my flakes couldn't travel all the way across, resulting in a weird look.  This is also why many of the arrowheads I have made are smaller than I would like.  I can not get the flakes to travel as far as I want, so I try not to make any large arrowhead that will not turn out like I want.  Ultimately, I need to start with smaller pieces in order to get the best arrowheads I can.

Overall, this week was meant for me to start working on stone.  I did just that but also got some more practice in on some glass arrowheads.  I am on schedule and hope to use next week to practice more with stone arrowheads.  I believe I am on schedule because I have given myself a reasonable amount of time to learn the skills and because I have been working hard to learn those skills.  I should be making a few from the agates, so be sure to view my next blog to see them.

My blog was shorter than I would have liked, and I apologize if it was a bit disorganized, but I will have something neat next week to make up for it.

Thursday, November 1, 2018

Week Four - Success and Disappointment

Click here to see a spooktacular Halloween card!  Click here to see my failed arrowhead background!

This week, I decided to use my newly perfected skills on a selection of fancier and prettier glasses.  I made more arrowheads than I thought I would this week, so there'll five to cover.  One of those arrowheads I will talk about for quite a bit.  I also promised in my last blog that I would go over step fractures so I will start with that.

I originally thought that step and hinge fractures were different names for the same thing.  However, the research I did said otherwise.  This website explained them both nicely.  It also goes further in depth with all the math that determines how the material flakes.  It surely can explain it better than me as the people that wrote it are professionals.  Don't read too deeply, though.  I don't want you to find out I misunderstood something or said something wrong.

https://drive.google.com/file/d/12fMZ8TItS1WSUat_FKQI0PhLDpMWRNlX/view

Either way, I made this beautiful graphic to help demonstrate the idea.  I even copyrighted it!  Press control and click any image to see a larger version.  Anyhow, the right side shows a hinge fracture and the left side shows a step fracture.  A hinge fracture occurs when a crack travels along the piece but then diverts to the face of the piece.  As such, the flake is smaller and there is this sort of "hinge" where the flake "hinged" off.  A step fracture occurs when a crack travels along a piece but then stops.  It is the follow-through motion of the flintknapper that removes it.  Due to the continuation of the crack, a step fracture usually ends with an area that is off-color to the rest of the material.  It is often obvious where the crack ended and how the flake should have looked, and it can sometimes be removed like a hinge fracture.  A few can be viewed on the refrigerator glass below.

https://drive.google.com/file/d/1KOGGBy4b_TTCc3nuL0AQVHZ593NrD5Ys/view

Here's another beautiful graphic!  Mrs. Crews mentioned how a girl somewhere in the country did graphics for her genius hour and gave that one genius hour sheet the girl made to us.  Perhaps that is an idea for another genius hour.  I doubt I will do any more for this project, though.  Again, control-click on the image to see it in a better resolution.  I use the word "biface" in the graphic.  It is a more proper word for an arrowhead and means that both sides of a piece of stone or glass have been flaked.  On a side note, I made the perfect graphic for Kyle, so check out his blog to see it.  If it isn't there, then he must hate me.

This one is all about hinge fractures and what to do with them.  Note how a hammerstone is pictured.  Only percussion flaking, a technique that involves striking the edge of a piece with a stone or antler, can create hinge fractures.  This makes sense as I have only come across them while using the copper mallets.  Hinge fractures seem to occur because the hammer can vibrate when it strikes the material.  Pressure flaking, however, doesn't involve striking the material so no such vibrations can occur.

On my previous blog, I said I thought the ridges seen on a conchoidal fracture occurs as a result of force traveling through the material as a wave.  From what I have read, it would appear that I was right.


Here are the five arrowheads this week.  Some of you who read my previous blog may be wondering where the spear point is, and I'll get to that.  There is a reason for the title of this blog.


This was my first arrowhead of the week, and it turned out rather nice.  I had been saving an Old Spice bottle bottom that was thicker and more flat for this week as I wanted to make something better from it.  It didn't turn out exactly as I hoped, though.


To start, I got a number of large hinge fractures.  This was because I needed to use the copper mallets to prepare the edges of the material a lot.  The one on the left was particularity bad.  I couldn't remove it using the pressure flaker as shown in the above graphic, so I had to reduce the size of the arrowhead.  This may have helped me, though, as I was able to remove all of the flat sections from the glass with the smaller arrowhead.  I also had a number of rather thick portions that were difficult to remove.  Another problem came when I was notching it.  I tried to go for diagonal notches, but the tangs broke off, so a stem was created.


Here's a massive flake I removed from the above arrowhead.  Sadly, part of the edge broke, but you can still see how gargantuan it was.


These three tall, dark, and handsome drinks of water were mentioned in the previous post, and I will go over each one individually.


This was the spear point I was making from a piece of refrigerator shelving.  You may not be able to appreciate it, but the flaking I was doing was the best I have ever done.  You can see how all of the flakes are parallel and extend for a good portion across the face of the glass.  I was so marveled by it, that I took three pictures.  Unfortunately, the spear point didn't turn out like I hoped.


I had spent maybe about an hour and a half working away at the point when I applied too much pressure on the center and it snapped.  This happened to my father with an obsidian point, so I was trying to be wary.  We even put extra tarps on the ground so it wouldn't break should it fall on the concrete.


This is the final result.  I continued working at the top, or right in the picture, portion of the broken point.  I had a nice shape going until an inch broke off.  As a result, the finished point is much smaller than I wanted.  I did remove all of the flat portions of the glass.  Had I not, it would have been very obvious due to the matte finish.  The base of the arrowhead is also a little weird. I was going to do side notches, but the bottom was damaged in the process, so I mirrored the pattern.  After I finished this arrowhead, I was going to make another from the bottom piece of glass.  Unfortunately, it broke and broke until nothing was usable.  As such, I am really disappointed with how this turned out.


This arrowhead, made from a sparkly purple glass, was next.  It turned out very nicely.  I had a different and radical idea to start with, but due to a few bad breaks, I went with this shape.  Otherwise, this arrowhead was rather uneventful.  There is, however, a hinge fracture on the other side.  I didn't try to remove it as I was afraid the tip could break off or the notches could become damaged in the process.


I was incredibly disappointed by this arrowhead.  This was the piece of red glass above.  The main issue with it was that the red glass was incredibly thin.  I should have broken it in half to begin with.  Multiple times while working at the glass, it snapped.  Eventually, this was all I could make.  I mainly feel bad because the materials are my father's, so I don't want to waste them, even if they've been sitting around for a decade.


My final arrowhead ought to be recognized by Kaden as I made it with the bottles he so graciously donated.  These were the club soda bottles from chemistry; they were fished from the trash.  I scored around the bottom of the bottle and then gave it a good whack.  The first one didn't break all that well and was unfortunately unusable.  The other two turned out very nicely, and I was able to make the right arrowhead from the flat portion of the bottle base.  There were a few extremely small flat sections of the glass that weren't removed, but they were so unnoticeable that I left them instead of reducing the size of the arrowhead.  I didn't see this until the picture was taken, but the left edge is uneven.  I will probably clean that up later.  Another thing to note is the color of this glass versus the refrigerator glass.  The former is completely colorless, but the latter has an attractive green tint.

Although I was disappointed with how some of my arrowheads turned out, they were all much better and cleaner than my first arrowheads.  I have talked before about how I have used the copper mallets to rough out the shape of the arrowhead.  However, I probably won't be using them anymore if possible.  They can produce hinge fractures and can leave an edge that is actually harder to work with.  If you look at what was going to be the glass spear point, you'll notice how the edge and the face are at right angles with each other.  I thought this would make pressure flaking impossible, but it actually allowed me to create larger flakes than I normally would have been able to.  Percussion flaking also is more, for lack of a better word, unpredictable.  I could strike the material and snap it in half or produce the massive flake you saw above.  It also might simply crumble the edge, requiring even more work to prepare it.  Nonetheless, I am more skilled now and realize what went wrong with my previous arrowheads.

Another thing I realized is that often you will need to work with and not against the material.  I usually have an idea for the arrowhead's final shape, but most of the time, something breaks and a new shape has to be chosen.  I am starting to simply work the material until a shape becomes evident; let the material choose its final shape, not me.

I will definitely move on to stone arrowheads next week.  I meant to make a number of nicer arrowheads this week, and I would say I succeeded.  I have had nearly a month to practice away at glass and will have nearly a month to work on stone.  Since I understand the techniques needed and what went wrong in the past, I may end up being ahead of schedule for the next couple of weeks.  No matter what, I doubt I will be behind.

A lot of the time, the stone will need to be heat treated before making an arrowhead from it so I will go over that process next week in detail.  It's sort of like baking, so perhaps I can collaborate with one of the cooking bloggers.  Furthermore, I plan to redeem myself.  There are some other pieces of refrigerator shelving I can use and even a fancy piece of obsidian with a golden sheen.  Hopefully, I will be able to make a spear point before the end of this project.