I got this idea after watching a TV show visiting different pizza parlors around the country. Seeing those delicious pizzas inspired me to create something amazing. Another reason I made this is due to the lack of quality CGI pizzas out there on the Net. I could only find a few examples, one being from the Sims, or at least it had that look, and the other from Inside Out. I am quite proud of this creation because, unlike the last one, this wasn't made from a tutorial. I got help from tutorials for specific things, but there were no step-by-step instructions for this pizza parlor.

First, I made a circle for the cheese. Circles have no faces when they first created, so I filled it with a triangle fan opposed to an n-gon. I figured a triangle fan might work better for what I was going to do.


After that, I solidified the circled and insetted the face numerous times. This insetting gave me many vertices to select and move.

I used proportional editing set to random, like with the donut frosting, and moved the vertices around, creating an uneven surface.


This worked pretty well, but the center looked all weird. When this happened to the jelly donut, I triangulated the n-gon center face to fix it. This didn't work for the cheese, and I also failed at using sculpting to fix it. Eventually, I moved a few edges and vertices around by hand and left it in the hopes that it wouldn't be noticeable in the final render.


Sorry, I am a little confused on what exactly these screenshots are showing that is different from one another. In the top, you can see the nodes I originally used for the cheese. I figured I was going to color the cheese based on height, and that is why I spent so much time making the surface uneven. I got the idea from this post. I tried to just copy the nodes at first, but it didn't work. After taking a closer look at the second answer, I changed one of my nodes, and it worked. So, I ended up using a little of each of the two answers to get it to work.


Here, I learned something very useful. I noticed that the texture nodes I have been using have an output labeled "Fac" and the mix shaders have an input labeled the same. I put the two together and got the left result. It seems to mix the colors based off of the texture pattern. In reality, I didn't need all the other nodes as this one node gave me exactly what I wanted. I would end up using this technique for many other objects in the scene.


These are the final nodes I used. The one big one is unconnected. It was used first but didn't work, like I said above. I also added a wave texture to the cheese. If the cheese looks bad, it's partly because of the lighting. I also adjusted some details later.

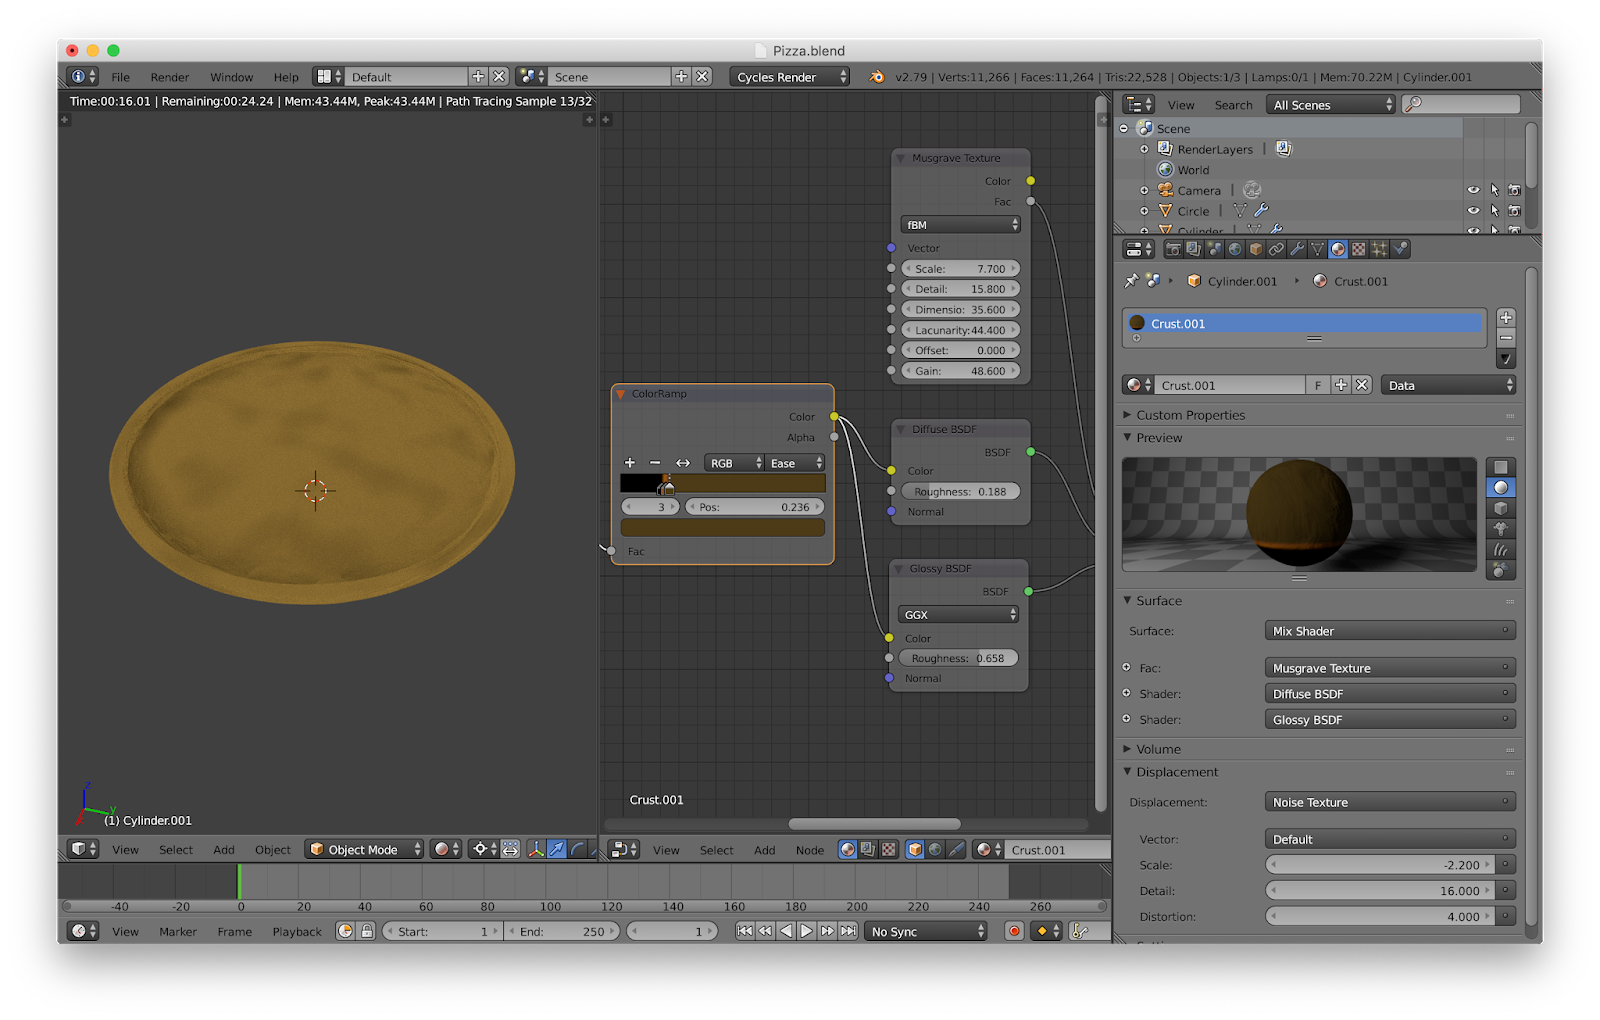
I can't just have cheese sitting on a table, so the crust is made. It is rather simple to model, and some proportional editing is used to make it more natural looking. I also used the same technique to color it as the cheese. A second copy of the crust is made to be used as a pizza plate.

The crust and cheese are married and I am able to move on.


The pizza can't be floating in the void, so a table is made. I add some loop cuts to the edge of a resized cube. This allows me to scale them out so the edge is more rounded. Adding a crease to the top and bottom faces keeps them flat, but the table is still too rounded.

I add a crease to the corners to remove the large round-over, but the table is now way too sharp. I decided to leave it and start the material. I had not yet realized that the entire node set-up I was using was not needed to get the different coloring, so I simply copied the cheese material and recolored it.

Eventually, the table was scrapped. The new one had a creased top and bottom face to give it a flat top and bottom face, but I got the roundness I wanted through a series of loop cuts.


I wanted some tables like in the photo to the left, so I needed to add some indents to the table edge. This required a lot of trial and error, but I eventually got the loop cuts to behave like I wanted to.

In Blender Guru's video on lighting, he explains at the end how to put two different materials on an object. I do that on this table to make the rim metal. I was pleasantly surprised to see it made a little of the top face metal as well. This helped to make it look more real. If I had not done it this way, I would have had to have made the metal rim separately and then put it into place, and the result probably would have been bad.


For the walls, a cubed is first resized. Three faces are deleted and the normals reversed so the lighting and shading would look better. I play around with the aforementioned color technique to get some psychedelic walls.

This is what I decided on. I colored the walls a light blue. The floor was made into a checkerboard by setting that face of the cube to be a different material.


The table stand is a cylinder with a few faces on the bottom extruded. I used the mirror modifier on this. It let me make one leg and then duplicate it across the X and Y axes to give me a symmetrical stand.


Bench time! I looked at some restaurant benches to get an idea of what I wanted. I thought the ones with a crease in them looked good. This crease, however, was way harder to do than I thought it would be. I must have fiddled around with it for an hour or two, and I don't even remember how I did it. I think it was done with some edge creases and some loop cuts.


I started a seat to hold the cushions, but I didn't like it. As such, I scrapped it. I also got rid of the seat cushion. I had used insetted faces to help round it properly when I should have used edge loops to begin with.

After looking at some more reference images, I got a design I liked. Like the table stand, the mirror modifier was used so I only needed to make one side of the bench. The cushions were copied and put into place.


Then, I added the materials. I went for a vinyl seating look for the cushions, so I added a wave texture to it. I planned for wood sides, but the UV unwrapping didn't go well and I didn't want to mess with it.

I set the benches into place. Before, they were on a different layer so everything wouldn't be in my way. This also keeps the polygon count low so it is easy to work. The right bench is clipping through the wall.

The benches and tables are moved and the pizza inserted into the scene. I also remove the sun lamp and add area lamps. One is yellow and the other is blue. The world lighting is also changed to pitch black.

A lamp was added above the table to provide a source for the lighting. Unfortunately, this lamp isn't in the final scene. The coloring was done with a diffuse shader and glass shader fed through a mix shader. A voronoi texture does the mixing.

I like this screenshot. It is like you are waiting in a virtual pizza parlor for your virtual girlfriend because you are incredibly lonely.

That napkin holder was created from a resized cube. I add a bunch of edge loops and then deleted all the faces except for the edges. some more edge loops tighten some curves, and the shell is solidified. An inner cube is inserted. The napkin itself is plane with an extra edge across the face that has been extruded. A texture helps give it some dimension.


I made some salt and pepper shakers for the table. They were simply a couple of cylinders. I ended up pressing the wrong key while making it and got that image on the left. I tried to make holes in it using boolean, but the subsurface modifier was making it kind of ugly. As such, I put some black octagons in the holes' places. Since it will be in the back, I figured no one will notice. The bottom of the shaker looks kind of wonky because of the low-poly mesh and the smooth shading not agreeing with each other. The pepper shaker is the salt shaker but recolored.


This is the parmesan container. I am pretty proud of it, and it is based on the top image. To get the round bottom ridges, I had to add a loop cut. However, when I went to scale this out, the entire mesh deformed. I realized that I needed to extrude the faces by pressing E and then press S to scale out. Pressing E followed by S created a double face that could then be adjusted without deforming the rest of the mesh. The ridges were done in the same way. The edges actually extend into the glass, but it is hard to see, especially when it is in the back of a scene filled with cheese.


I decided to use the same boolean method on the cap, but it is added before the subsurface modifier. The cylinders also go through the entire cap, which helped. Unfortunately, the result was ugly. This was because the computer did a bad job dividing the n-gon face into proper faces after the holes were put in. I deleted the faces and, by selecting each vertex, added in my own. I was afraid it would turn out bad, but it ended up looking perfect. After the fact, I realized I should have tried to dissolve the edges of the faces. If it would have worked, about thirty boring minutes would have been saved.

I made a cylinder the size of the inside of the container. Using a texture node and a load of mix shaders, I am able to give it a grainy look, as if it is powder.

Here it is, the finished parmesan shaker, the top piece is metal and is reflecting the black void, which is why I added a roof before rendering.

Heres a picture of the whole scene. Only a corner is seen in the final image. Note the sodas. They were simple modeling, so I didn't mention them.
The above videos are a couple I took while working. The top is of the scene while in material mode. This shows what the objects look like with color but not texture or lighting. It reminds me of the behind-the-scenes extras from a Pixar movie. They may show a scene with no color, then color, and then finally rendered. Most of the deleted scenes you see with CGI movies are still drawings or grey blobs, and that is because the scene is scrapped before it is finished. Animation takes a long time, so most unnecessary scenes are cut early and not after a hundred hours has been spent creating and rendering it.
The second simply shows a weird double face flickering issue I had with the cushions. This is probably because of the mirror modifier and it doesn't show up in higher subsurface levels, i.e., in the final render.
Finally, some things are tweaked to get this ...
The second simply shows a weird double face flickering issue I had with the cushions. This is probably because of the mirror modifier and it doesn't show up in higher subsurface levels, i.e., in the final render.

Beautiful, isn't it? I really like the napkin holder. Although this took three and a half hours to render, I decided to re-render it. The parmesan cheese looks way too noisy. The pizza also looks a tad flat, so it was thickened. I also messed with the color of the plate but ended up leaving it close to what it was originally. Mainly, I wanted to get rid of the noise visible in the reflections. Glass and reflections are breeding grounds for noise, and they probably also increase the time to render.
In the second render, I lowered the poly count of the background objects to something more reasonable. The salt shakers didn't need to be made of a half a million polygons. All the loop cuts I did also increased the number of polygons by a lot. Most of them were unnecessary. I wanted them to be placed evenly, so I raised the number of loop cuts until they approached the edge. The inner loop cuts could be dissolved to lower the poly count. I also lowered the max number of light bounces. Most of the time, this can be lowered greatly without it affecting the look of the scene. Really low numbers, like one or two, can make glass dark and weird looking, though.

And here it is. Here is the Google Drive link to download it.
Overall, I am extremely proud of how this turned out. This was not a step-by-step tutorial like the donuts. If you searched up "Blender Guru donut scene," you would get dozens of examples. Making something on my own was very fun. I also used some more advanced modeling techniques to get the shapes I wanted and some new nodes set-ups to get variation in color on my meshes.
Next week, I am planning to model a flower, probably a rose. I think being able to model plants is a useful thing to be able to do. If I ever want to make an outdoor scene, I will need to be able to make plants. Also, this scene took a long time to create, so making one, albeit detailed and complicated, object will give me a break. Besides that, I also want to try the animation parts of Blender, and I want to make some sort of abstract art. Luckily, I still have a few weeks to do so. Perhaps an animation would make a great third genius hour. At least, it is something I have wanted to try for a long time. Unfortunately, I never had the skills or the tools. Lowering the poly count as mentioned above is going to be very important when I do that.
There is this website I have visited a lot to get answers for various problems I have came across called blenderartists.org. There are some amazing pieces of artwork on there, so check it out. This one I really like because it looks like a 2D drawing. You can also move the model around. Some of the people go for photo-realistic and others go for a cartoony look, so you get a good sense of what can be done. I will note, though, that many of these people use other programs for certain parts, like textures.
I was supposed to be working on the donut scene this week, but I finished it way ahead of schedule. The second thing I was supposed to do was Blender Guru's anvil tutorial. However, I didn't really want to do it so I will watch the video to learn about UV unwrapping and normal maps when the time comes. Other than that, it goes into some more advanced modeling techniques.
Thanks for reading! Tune in next week for a CGI rose!