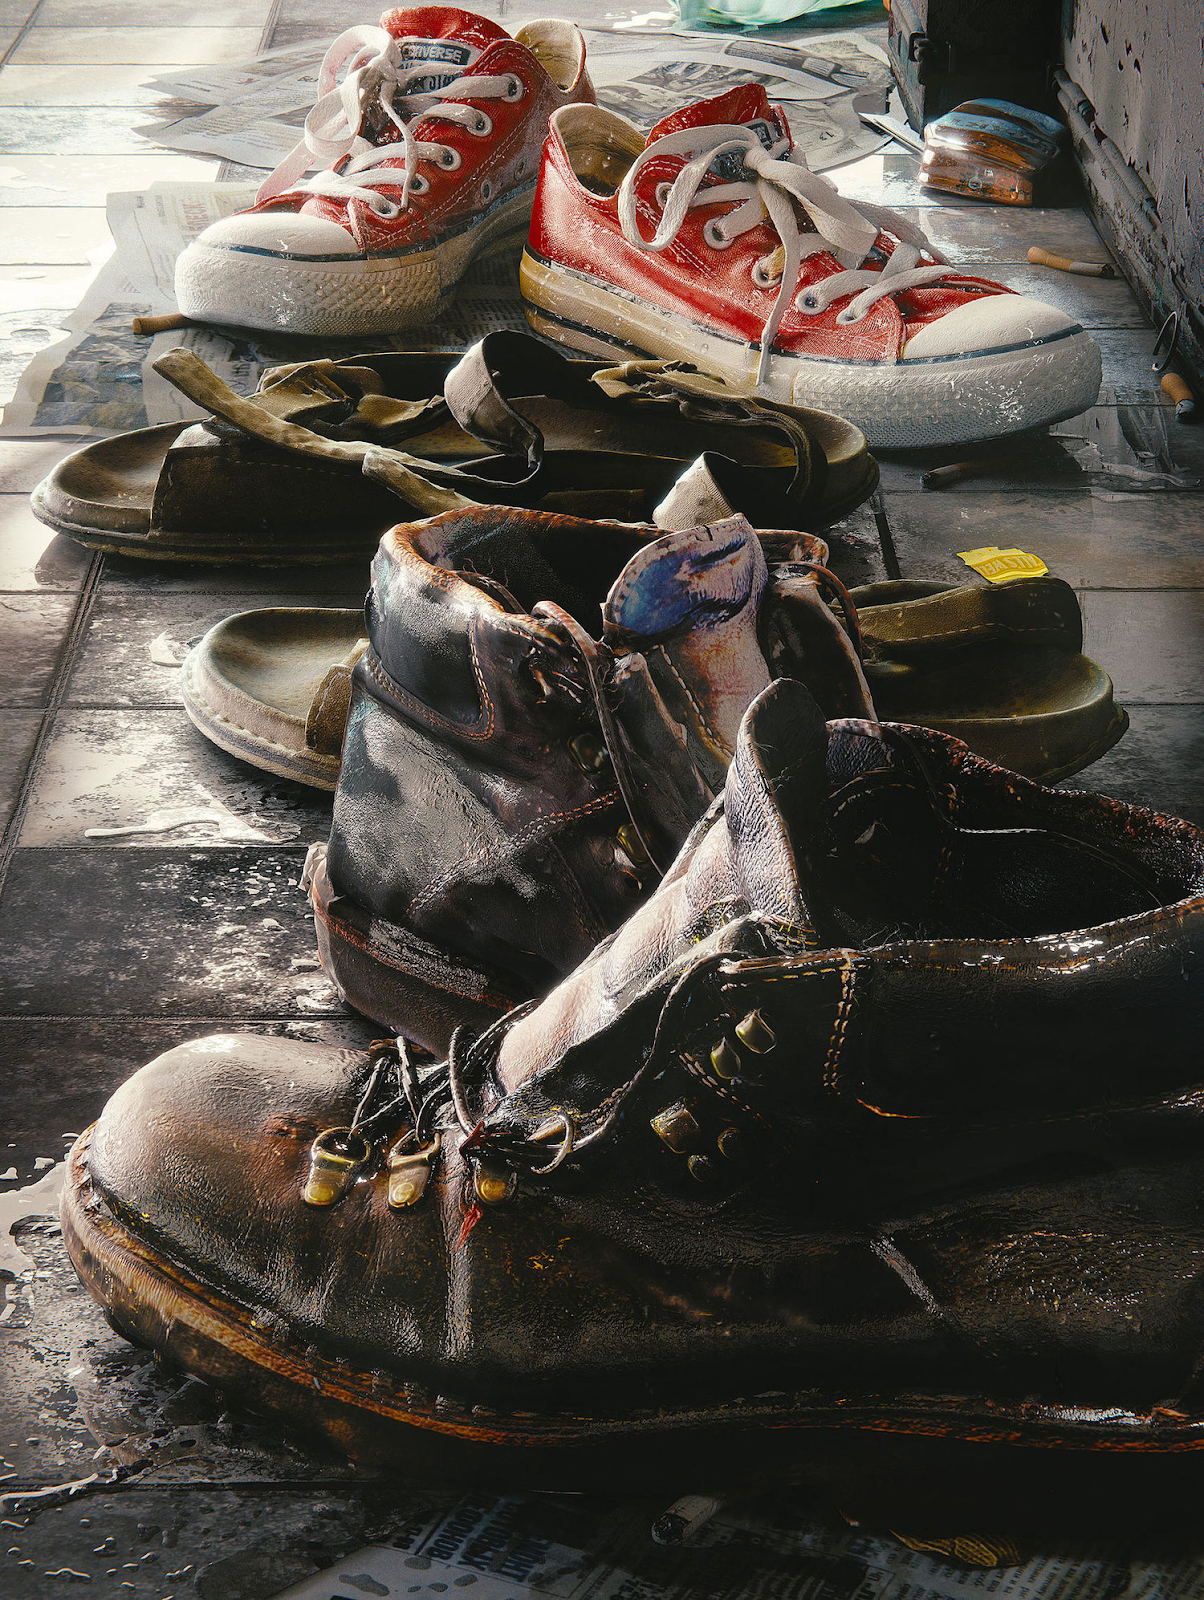
There is a lot more to 3D modeling than simply slapping a few shapes together. For example, there are texturing and materials. To make an object look realistic, you need to do more than simply color it. The above image looks incredibly realistic, and that's because the creator took the time to ensure that everything looked like it should. The leather isn't all the same texture or color, so a lot of work has to be put into making the material and textures.
Blender, and most modeling software, have ways to do this. However, I don't exactly know how to it, yet. The texture could be a normal map. These, from my understanding, are an image that the software reads and then uses to project height onto an object. This is so you don't have to model every bit of leather grain by hand. It also allows you to have highly detailed objects without having a high-poly mesh. The more polygons an object has, the longer it takes to render.
There are also ways to get the multitude of colors you see in the shoes. One way, which I have yet to learn, is to set up a shader that colors the object differently depending on how high or low a portion of the mesh is in relation to the surrounding mesh. This would be useful to make the creases in the leather a darker brown than the raised sections. There are also ways with noise maps. You basically generate static, resize it, recolor it, and change it as needed in order to get the desired effect.
The above image also shows how light is a part of 3D modeling. There are reflections on the shoes and on the water. If the shoes were shining like metal, it would look fake. Similarly, if no light was reflected, it would look fake. A perfect balance is needed. The light also needs to make sense for the scene. If there is a window or lamp, the light should be emitted from them, not a wall or table. For a CG monster, the light needs to match the scene it will be placed into.


There are also particle systems, which I will be using on my first project. The above three images most likely used a particle system. These are used when you want to place numerous objects into a scene without taking hours by placing them by hand. In the first photo, the leaves are probably a particle system. The creator would have modeled the branches and then modeled a leaf. The particle system would have then placed them on the branches. He could have then adjusted the number or size or randomness. The grass in the second photo and all the pebbles in the third would have also been a particle system.
If it already wasn't clear, there is a lot that goes into creating a realistic CGI image. I hope to learn these skills. However, I will also like to simply make something cool to 3D print. That object won't have any textures.

Those images are really cool, but they are way above what I could do. However, I think the above two images are some examples of what I could do. I think trying to model real objects is a good place to start. Ultimately, modeling a whole scene based on a photo would be very cool. I could take a picture of a portion of my house or a room in the school and then recreate it in Blender. If they look similar, then it is a success.

I chose this as my genius hour because I thought it would be fun to learn. Being able to model an object or scene in Blender is going to be very cool, at least for me. I did a little 3D modeling in AutoCAD to make a carburetor cap. Although it was a simple shape, it took us three days to model as we fumbled around with the modeling capabilities of the program. Despite that, it was fun to do. In some cases, my experience with AutoCAD may help me. In other ways, it will hurt me. I will have to learn new shortcuts and controls for Blender because basic commands like Delete use different keys. The above image is a house interior modeled in AutoCAD.

I will be learning Blender through YouTube tutorials and by simply messing around and see what does what. This above tutorial is actually the first thing I am going to make. It is a rather long tutorial, but I have watched most of it already and should hopefully be able to search up what I don't remember how to do. The creator of this tutorial is Blender Guru, and I have already watched a number of his videos. Therefore, I will probably use him to learn most of the necessary skills.


The first image was what I made when I first fired up the program. I was mainly just messing around, though. The second was me following a tutorial for a water animation. These two images sort of exemplify how I am going to determine my success. For example, the first image looks really bad. If I spend hours actually trying to model something, and it has that early 2000's CGI look to it, then that isn't a success. I do like the early 2000's CGI aesthetic, however. Another measure is time. If I fumble around and take hours to make something because I am clicking all the wrong buttons, then I haven't really learned. Finally, independence will be the final determining factor. I want to make things on my own. If I can only follow a tutorial or have to go to Google for every other thing, then I am not learning anything. I am just copying some guy in a video and will be unable to model anything on my own.
The second image also gave me a good idea of problems I will have off the start. It was supposed to be an animation of water pouring out of a pipe. I followed the tutorial and blindly set all the settings to what he stated. However, the computer couldn't handle the extremely high resolution all that well, so after about three hours, less than a second had been rendered. I choose a good frame and saved it. I sort of mentioned above how normal maps allow you to shy away from high-poly objects to save render time. I will have to deal with waiting ten or so minutes to see my final image if it is simple. If it is more complex, a couple of hours.
Blender Guru has a video on reducing render times. I watched a part of it, and he starts it off by walking in to see it only took sixteen hours for a single frame of his animation to render and calculated that it should be finished in forty years. I can lower the quality of the final image to speed up the rendering, but hopefully render times won't be a problem with the more simple scenes I am making. For movies, the animation studios probably have state of the art equipment and know what tricks to use to speed up the rendering times.
Overall, I think this could be a very fun and useful skill to learn. Blender is a free program so I could use it whenever I want. Furthermore, 3D CGI is used for a lot of things. For example, most IKEA photos are CGI renders. Live-action and animated movies rely on 3D modeling. The same for most video games. Even architects use it to model home interiors to show clients. If I would have gone to the actual Shark Tank or bank for a loan, a modeled version of my proposed idea could help sell it.
Over the next couple of weeks, I plan to create Blender Guru's donut tutorial. I will actually probably start working on it early. I think I need to do it in order to properly learn the basics, but I really want to start modeling some other stuff. Mostly, I will model real-life objects and maybe do a still life image. Blender can also be used to animate things, so maybe making a robot and having it walk or break dance would be cool.
Anyhow, tune in next week to see me make a donut!
I think this is a very good thing to spend time on to learn how to do. I believe this is the is going to come in very handy in the upcoming years. I have 0 knowledge of this topic and look forward to see how it goes for you
ReplyDelete*insert period above
ReplyDeleteThis seems like a very challenging project, but seeing how much work you have already put into it I think you'll do great. I look forward to see your completed donut picture.
ReplyDelete